Tuesday, August 21, 2012

Beware the Disjoin


When we do a Move command in Revit, on the Option Bar there is an option for Disjoin. this option stays as it was set for every Move and even stays set from session-to-session.

When Move is done with Disjoin, it is as if we'd copied the selected element(s) and the deleted the original selection. This is sometimes very useful, especially when Revit has set up some association (especially with walls) that is affecting other elements that we don't want to move.


On the other hand, when elements are moved with Disjoin, most associated elements are deleted. This includes dimensions, tags, keynotes, etc. "Based" families are also deleted, with the exception of Wall-based Doors & Windows (there may be others). One will get this warning if something is about to be deleted because of the Move:


Be aware and do not blithely select OK. "Can be ignored" -- yeah, if you don't mind perhaps destroying thousands of dollars of work.

Most importantly, never move a Level with Disjoin without really thinking about the implications. The views and anything else associated with that Level will also be deleted. That could be really bad. Also in a worksharing situation, there may be no Undo after that's happened. If you find yourself in that situation, consider not Synchronizing, discarding your session, and making a new Local.

Here is the "Advanced Sample Project" before, and after, moving "01 - Entry Level" with Disjoin on:


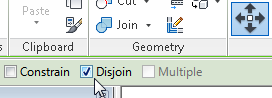
So, when doing Move in Revit, I suggest always looking up on the screen and checking the status of the Disjoin option.

Friday, May 4, 2012

Revit Learning Club Content Clinic to be Held at BSA

Revit Learning Club Content Clinic

Update: The clinic at BSA has been cancelled due to not enough people registering.

Learn and practice in-depth aspects of content creation in Revit. Parametric solids, Family Types, references, constraints, Type Catalogs, Materials, and embedded Families will be covered.

Optionally, bring a laptop with the latest version of Revit installed and a mouse if you would like to practice the subjects covered.

The instructor, Eric Boehlke (truevis.com), has made myriad Revit Families professionally in his consulting business. See this album to view some of them.


Sunday, May 20, 2012, 10:30am to 2:30pm. Price: $60/$45 BSA members. At BSA Space, 290 Congress Street, Boston, Massachusetts.

Parking meters are free on Sundays in Boston.

The course is limited to the first 20 applicants and advance registration is required. Enroll by noon on May 18. Online registration

It's on the Boston Society of Architects calendar at http://www.architects.org//calendar

Tuesday, March 13, 2012

How to Get a Color From Your Screen into a Revit Material

Someone has shared a very nice color picker utility called Colorette, which was written in AutoHotKey. The app description is at http://www.autohotkey.com/forum/topic69559.html and the EXE itself is http://www.autohotkey.net/~sumon/apps/colorette/Colorette.exe .

For an example of how to use Colorette with Revit, save the EXE to your Desktop and run it. Find a web page with the color you want to find, like http://www.jameshardie.com/homeowner/colorplus-palette.shtml , hover your mouse over the color on the screen and press Space on your keyboard. A color dialog will appear with the RGB values.


In Revit, find a similar material to what you want and copy it or edit an existing material. In the appearance settings, edit the Color of the material.

Type in the RGB (Red, Green, Blue) values that Colorette has found. 

Check "Use Render Appearance for Shading" in the Graphics tab. 

When you look at your material, it will have the color that you had selected.

Make Siding to Match the Manufacturer's  Published Colors

If you want to change a "wood" siding material to that of your picked color, duplicate the "Siding - Clapboard" material (which is in the Residential template) with your new name.


Change the material's image to "Thermal_Moisture.Roofing_Siding Panels.Wood.Horizontal.White.png".


Move the "Image Fade" down to around 15.

Get your color with Colorette.

Edit the color's RGB values. The color will mix in with the siding image to make the new material appearance.

 A rendering of the result:

Tuesday, January 3, 2012

DWG Software

Just want to view a DWG quickly? I have found nothing better than Free DWG Viewer from Brava.


If you need editing and measuring, etc. DraftSight is free CAD software from Dassault. It requires registration, but it's rather heavy-duty and the price is pretty good.

Autodesk has some Free DWG viewing software. Last time I tried their TrueView app, I found it to be just too big to be convenient for a quick viewer because it seems to be full AutoCAD with all of the editing tools turned off. It would surely be the most accurate, though, because it's from the mother ship. Design Review is also said to work to view DWGs but this is what you see if TrueView is not installed: