Tuesday, December 23, 2014

Photogrammetry Mesh into Revit as Point Cloud


I made a photogrammetry mesh of a building facade in the free version of Recap 360 from about 50 images. It came out really well, even though all of the photos were taken from ground level.


From there, I downloaded the files as a ZIP, which contains the mesh as OBJ. Its "materials" are also included, but using them is another issue.

I opened the mesh in the open-source MeshLab. It looks very good. 

The big challenge is to get it to the proper scale. A known distance on the building is required. I assumed that the double doors are 6 feet wide.

From the mesh, using the Measuring Tool in MeshLab, it read 4.493.


6 feet equals 1.83 meters 

I calculated 1.83 ÷ 4.493 = 0.407 (remembering that number).

I export from MeshLab as format XYZ. I believe that MeshLab writes a line in the file for each vertex point in mesh.


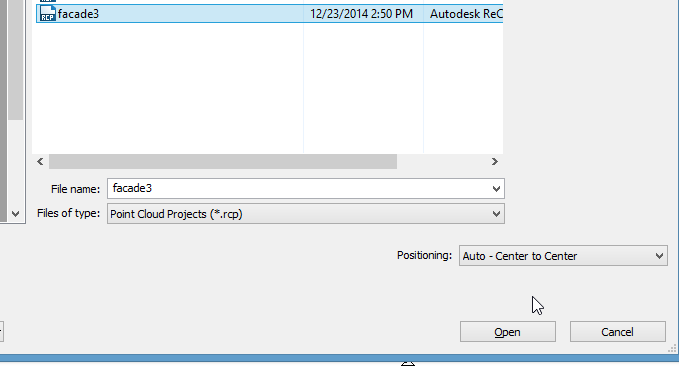
Thence, I started a new project in ReCap and chose the XYZ file.

How did I get the points scaled correctly?

ReCap's units are meters. Under the scan settings, I changed "Unit: 1 Meter" to 0.407.


I also reduced the decimation to 1mm.

The points came into ReCap.

I saved the RCP file to bring into Revit.

I imported the RCP into Revit, center-to-center.


Using Measure Between Two References in Revit, I found the point cloud's size to be correct. 

I then had to rotate, and move, the point cloud. Now, it's ready to trace.


PS: An alternative method would be to scale the mesh in MeshLab to meters before exporting the XYZ file. The concept is explained in this video: https://www.youtube.com/watch?v=6psAppbOOXM . That way, the scale would not have to be altered in ReCap.


Monday, December 1, 2014

Autodesk Revit 2015 Update -- R2

In September, 2015, Autodesk published their latest update release "R2". It is actually the fifth update release to Revit 2015. Its name, getting it, and installing it, are all rather confusing. When it's all installed, if you look at Revit's "About" dialog...


it should look like this:

Yes, they're calling it "Update Release 4" in that dialog.

You can get the update from the Autodesk's Subscription Center at
http://revit.downloads.autodesk.com/download/2015RVT_RTM/UR6/AutodeskRevit2015UR6andA360CollaborationforRevitv3downloadlinks.htm#Sub_Prod_Line

You need to have a valid log-in to get it.

The installer for full Revit is named "Autodesk_Revit_2015_R2.sfx.exe". Be particular about which one you download, and match the flavor of Revit you are updating. For example, if one has full Revit installed, the Architecture one won't do anything.


The update will only work on the initial release of Autodesk Revit 2015 (build: 20140223_1515) or Autodesk Revit 2015 Update Release 3 (build: 20140606_1530), according to its release notes (and my limited experience). If you have an update release installed besides 3, you can uninstall and install Revit 2015, then run the EXE.


Application Manager

If you have Autodesk's app, "Application Manager" installed but don't have admin rights in Windows, it may tell you it's already installed the update. However, it doesn't actually do anything (in my experience). Even if you have an administrator account, the notices of "Application Manager" may be wrong. You really have to check Revit's "About" dialog to see what version of 2015 you are actually running. "Application Manager" is a good idea but it installs without asking the user, runs on startup, and doesn't seem to work right. It can be uninstalled after the initial Suite install.

R2 Thoughts

Everyone knows that it's best for people working on the same Revit project all to run the same version (update release) of Revit. There is no sure way to know what the side effects of not doing that are.

Autodesk claims that a productivity enhancement of R2 is "Work in perspective views, making quick adjustments without having to change views with some modeling capabilities now available in perspective views." If anyone can find that enhancement in reality, please let me know. Update: Autodesk has documented the features, including a video at http://knowledge.autodesk.com/support/revit-products/learn-explore/caas/CloudHelp/cloudhelp/2015/ENU/Revit-DocumentPresent/files/GUID-32B9E3E8-75C3-466D-A0E7-A8F377A851ED-htm.html

An interesting feature of R2 is that it comes with Dynamo installed. That's a whole new world of programmatically controlling Revit. See http://dynamobim.org


Monday, May 26, 2014

Sketchy Lines In Revit 2015

This is an improvement, especially when one is trying to imply that one's design is still in the conceptual stage. People often see things produced on computers and take them for the literal outcome.

I have observed that sketchy lines do not affect arcs in views, which limits the usefulness of the feature. Text is also not affected, so fonts need to be changed appropriately to add to the sketchy effect

You can go from this:
To this:

First, "Enable Sketchy Lines" in the view's Graphics Display Options:
Set the parameters: 
You may like to set the Course Scale Fill Pattern to a solid grey color for your Course detail level for each wall type:
In all of your tags, you will want a sketchy font like "Buxton Sketch"
The only workaround for arcs not being sketchy that I know of is to replace them with straight line segments but that is not too practical. Making door swing lines thicker helps the appearance, somewhat.